Lets say you just did the cutest layout but the kit didn't come with an alpha, or you really love one of the papers or patterns in a kit and want to coordinate your alpha to that, or, well, any number of reasons. Here is a simple way to make your fonts work for you:
1) Select a font that matches the layout style. This whimsical kit, Camden's Buddies, has a bunch of fun, adorable dinosaurs, so I wanted a rough yet playful title art. I selected Jailbird Jenna because of its 'broken' nearly concrete feel and the offset baseline of the letters.
2) I typed the words in the size I wanted. I called my page Sizzling Saurus.
3) Then, in your Layer's menu, select 'Rasterize' (about half-way down the pulldown menu). This converts the editable type into pixels.
From here you can do a number of things. I'm going to show you 2 that are a quick and easy way to make a coordinating alpha for your layout.
Stickers
Do steps 1- 3 from above
4) Creating a font sticker is a simple as stroking your rasterized words. With your word layer selected, Go to: Edit >Stroke.
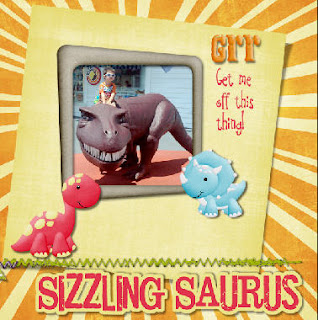
5) Use a wide point size to get a thick sticker border, lets say I put in 10 here. And then I select the color by clicking on the color box. I use the eye dropper tool to select a color within my layout to make sure it all fits nicely together. 
6) Then create your shadow or use as you would any other alpha. What I love about this method is that the word can all connect. I think its a fun look. 
This is my page with the sticker alpha words I created.

Patterns/Paper
The second alpha type trick is to take your rasterized word, make it into a mask by pulling in a fun patterned paper. Do up to step 3 from above.
4) select the paper you like, then bring it in on a new layer, above the rasterized type layer.
5) holding down the Ctrl key (Cmmd key on a Mac), click on the line between your paper layer and your rasterized words in your layer palette. This clips the paper to your words.

6) Go to your word layer and select just the letters. (a quick and easy way to do this is to select all (ctrl A /cmmd A) then using your arrow keys, nudge the selection. It will automatically select just the words on this layer).
7) add a new empty layer and, with the outline of the words selected from step 6, go to Edit> Stroke. Select the color and stroke width (I chose 10 pts and the pale yellow from my background paper).
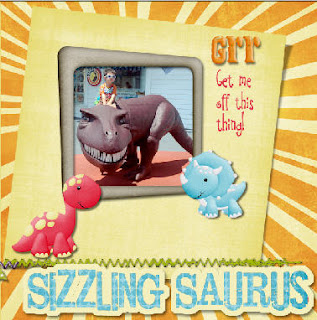
8) add a slight drop shadow and there, you have a sticker alpha created from your paper.

And this is the finished page using this font treatment:

I hope you enjoyed this quick and easy way to create your own alpha words. It really makes your title stand out. Because of Christina's whimsical style, its a perfect technique to use with her fun kits.
Be sure to pop over to ScrapMatters to see what other goodies Wimpy Chomper's Creations has.


No comments:
Post a Comment